Overview of Nuke
This week an overview of Nuke where introduced, the basics of the viewer window, time line including in and out points, the projects settings information’s in the viewer (Bottom), Gama and Gain control de exposure of the image (top viewer). Also, showing the Node Graphs and adding more nodes to the project.
Setting project directory
Each section, the projects will be at the desktop. A folder called Nuke_Overview where downloaded from blackboard to the desktop.
Now with my Nuke 13.0v1 open and before bring any Nuke Comp script, Press S in the Keyboard to set up the project settings. Pressing the `Script Directory` folder in project settings box and search to Nuke_Overview folder saved to the desktop and press open not going in to any of the folders. With the project directory set which is very similar to Maya, to have it all in specific folders, to be a where when to move files around, and then, go to Files, Insert Comp Nodes, navigates to the Nuke_Overview folder saved to the desktop once again, click in the nuke_scripts, and choose the folder, and click open.
To view the image on the viewer window click and press 1 in the keyboard.
Rodrigo Rodrigues
Week 1: Intro to Nuke
With Mr. Angus Luscombe MA, BSc (Hons), FHEA
Course Leader BA (Hons) VFX and
James Taylor
Overview of Nuke
This week an overview of Nuke where introduced, the basics of the viewer window, time line including in and out points, the projects settings information’s in the viewer (Bottom), Gama and Gain control de exposure of the image (top viewer). Also, showing the Node Graphs and adding more nodes to the project.
Setting project directory
Each section, the projects will be at the desktop. A folder called Nuke_Overview where downloaded from blackboard to the desktop.
Now with my Nuke 13.0v1 open and before bring any Nuke Comp script, Press S in the Keyboard to set up the project settings. Pressing the `Script Directory` folder in project settings box and search to Nuke_Overview folder saved to the desktop and press open not going in to any of the folders. With the project directory set which is very similar to Maya, to have it all in specific folders, to be a where when to move files around, and then, go to Files, Insert Comp Nodes, navigates to the Nuke_Overview folder saved to the desktop once again, click in the nuke_scripts, and choose the folder, and click open.
To view the image on the viewer window click and press 1 in the keyboard.

Exercise - The Hangman
Using the Merge Nodes (M) to connect the pods and then uses the Write Node to save the final work, clicking in the file icon at the write box


With Mr. Angus Luscombe MA, BSc (Hons), FHEA
Course Leader BA (Hons) VFX and
James Taylor
Organization, Nuke recap on project directory
Setting project directory
Each section, the projects will be at the desktop. A folder called Nuke_Roto_Basic where downloaded from blackboard to the desktop.
Now with my Nuke 13.0v1 open and before bring any Nuke Comp script, Press S in the Keyboard to set up the project settings. Pressing the `Script Directory` folder in project settings box and search to Nuke_Roto_Basic folder saved to the desktop and press open not going in to any of the folders. With the project directory set which is very similar to Maya, to have it all in specific folders, to be a where when to move files around, and then...
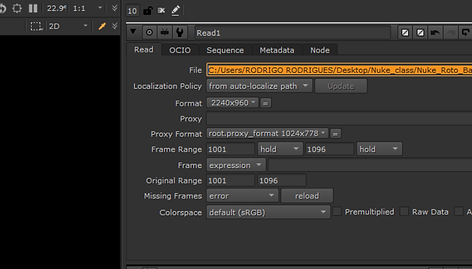
Reed in the file to be worked, press R in the keyboard and select the file. With the Project Directory set, in this case the format size in the project settings was changed to 2240x960 to match the sequence image.
Frame range to start with 1001 (normally used in the industry) and also be aware to choose the fps accordingly to TV regions for example (Phase Alternation Line - PAL = 25 fps or National Television Standards Committee - NTSC = 29.98 FPS), Film which can be 24fps like for Cinema packages (DCP) and more.
Next the path was removed to be able to work in different machines and or hand over the project to a different artist.

Organization, saving the comp
Saving Comp As/Nuke_Roto_Basic/SHOTS/B001_BEV_355/DATA
And then in Data, a new folder called `SCRIPTS` was created where all Nuke scripts will be saved and last labelling the folder as Creating_Project_Directory_01_v001 as the screenshot shows below, `A good practice to get into following the industry terminology` as mentioned by James Taylor in the blackboard video.


Rotoscope
In week 2, Mr Angus introduced and discussed the Rotoscoping and how the technique appeared, mentioning the historical origins, and current usage.
On October 9, 1917 was officially approved a patent application to United States Patent and Trademark Office, applied on December 6, 1955, made by Max Fleischer with an invention called the Rotoscope. A technique that uses a frame-by-frame drawings, constantly used until today in CGI and as VFX tool.
https://www.fleischerstudios.com/rotoscope.html


Masking
After the protect is Set, a Copy node was placed and then the Roto. A mask was performed, right after a blur node have been added to blur the alpha channel just enough to soft the sharpness of the edge like the video below.To blur the entire image a Blur Node should have been placed under the Read node.

A - Keyboard for Alpha channel

Q - Keyboard to Overlay on and of
Cutting out object from the scene. Premult...


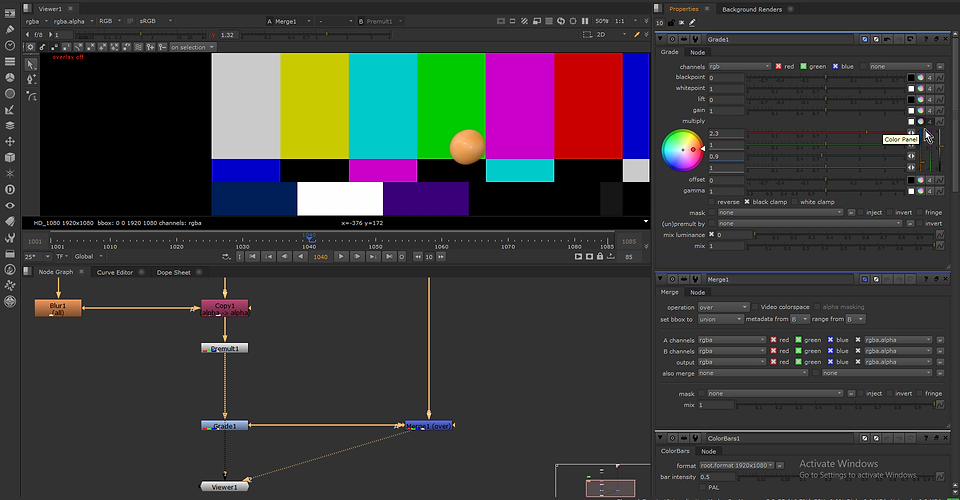
...ColorBars and merge node Connecting ColorBar to Merge and Merge to Permult, Premult view in 1 and Merge in 2..

D - Keyboard to block the effect of the node

...Premult placed under the Copy nod.


To Grade bring the Grade node under the Premult Node to Changing Color in the color wheel under Multiply tab like as the screenshot below.
.png)

Extending a new sweet, add Backdrop and saving the Comp


Bringing dot pressing dot in the keyboard extending to the next sweet...
And then bringing the Copy Node and Roto node.png

Adding Backdrop selecting the nodes and then pressing Tab to organize it better.

Saving comp as in file and then Navegates to the Folder BALLS cliking in it and then creates a folder called DATA

Inside the DATA folder creates a folder labeled COMP.

And then name it as Balls_roto_v001_01.png
Step by Step my Rotoscoping video process below
Final work containing different masks around the shot and green colors applied and some atributs


With Mr. Angus Luscombe MA, BSc (Hons), FHEA
Course Leader BA (Hons) VFX and
James Taylor
Complex Rotoscoping Talk with Mr Angus
Week 3 Mr Angus presented an slide (Complex_roto.pptx) and talked about Technics, in how to Rotoscoping complex scenes in the best way to accomplish more accurate final `Roto` work.

e.g. Bad Roto
Using the vertices around of a person or an object, frame by frame, takes longer, difficult to achieve a professional look at the end, its not an ideal at all. (Pic 1)
The boiling effect will be visible in this example.

e.g. Accurate Roto
Using shapes will turn the work preciser, easier to move around as objects then each vertices frame by frame. The articulations and curves of objects and characters can be represented better by the shapes.(Pic 2)

A good Alpha generated
Here is an excellent example of a professional and functional generated Alpha. (Pic 3)
Setting Project Directory Recap
Step 1 - Keyboard S to bring Project directory click in the folder then navigate to Desktop/`Nuke_Roto_Advanced` …the top most folder and click open.
Step 2 – Mouse cursor on the Nude Graph press Keyboard R (Reed Nude) to reed an image sequence. Navigate to Nuke_Roto_Advanced/SHOTS/FINGERS/RAW/Fingers/1920x1080/fingers_01.####.jpg 1001-1150, and then click open.
Starting
Step 1 In the NodeGraph select the image and Keyboard 1 to connecting it, with the viewer window.
Recap – Change the project settings to 1080 and 25fps accordingly to the footage shooting.
A. Keyboard K (CopyNode) and Keyboard O for (RotoNode), connect CopyNode B to the image and A to RotoNode, leaving ViewNode under the CopyNode.
The Bezier was shoosen to draw the shapes of the tip of the thumb`s finger, and then the B-Spline to draw the next two shapes.


Keying the Roto / Feathering the Alpha Channel
B. Moving and fixing the Roto in different frames. Feathering the Alpha Channel for the hard edges of the footage.
Saving the comp As... Recap
Nuke_Roto_Advanced/SHOTS/Fingers/Data/
And then, in Data, type manually Fingers_roto_v001_02 as the screenshot shows below, `A good practice to get into following the industry terminology` as mentioned by James Taylor in the blackboard video.
Index Finger Roto/Motion Blur/Shape colouring
Using the B-SPline the three shapes of Index finger was created, an automatic Motion Blur applied to Alpha Channel and Blue colour applied to Index finger Shapes.
Hand Wave Exercise
To support my Hand Wave Rotoscoping, I start reading the book; Rotoscoping Techniques and tools for the Aspiring Artist of Benjamin Bratt.


%20PremultNode%20positioning%20under%20the%20CopyNode.png)
%20PremultNode%20positioning%20under%20the%20CopyNode.png)
Replacing the background Recap
KeyBoard (Tab)/PremultNode and then positioning under the CopyNode
Background replacement
KeyBoard (Tab)/ConstantNode changing it's colour in Properties and then MargeNode positioning under the ConstantNode.
With Mr. Angus Luscombe MA, BSc (Hons), FHEA
Course Leader BA (Hons) VFX and
James Taylor
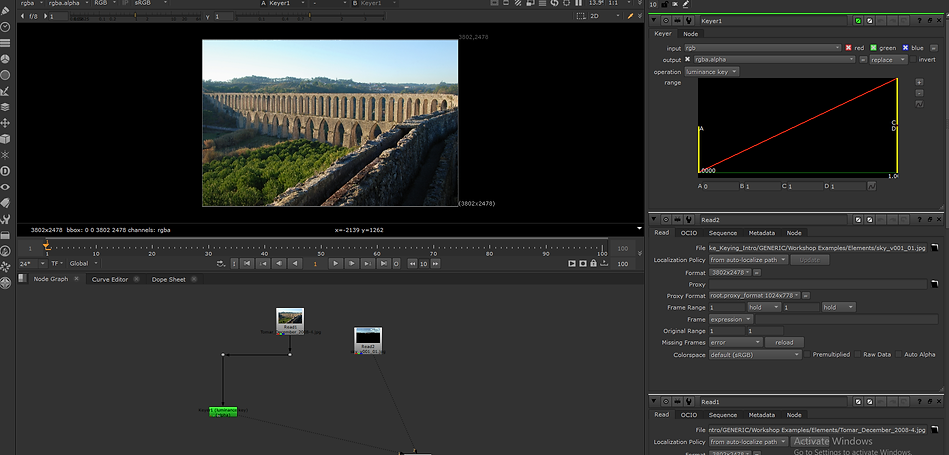
Practicing Luma Keying
1. KeyerNode placing under the main image, adjusting the Range of the Luminance Key at the Properties section.
Practicing Luma Keying
2. Adding text...
3. Adding text...
4. Adding text...


6. bringing the PremultMergeNode to cut out,

7. BlurNode under the KeyerNode, changing the Size slide init`s Properties panel... Working with keing its important to pay attention in the edges, leaving it not to sharp and not to white at the edges.
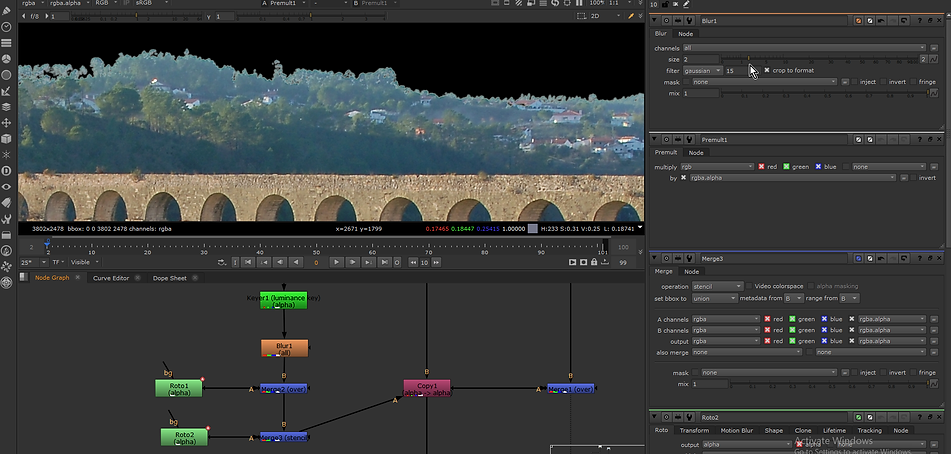


ColorDilationNode to expad the edges (Its a Text Node in word Documents format, copy and paste into the NodeGraph pluas option uses the LightWrapNode if needed or as an extra option.
Practicing Luma Keying
Practicing Luma Keying 2
1KeylightNode palced under the main image after 2 points. , selectkeyLight properties click in the Screen Colour, then click on viwer, and the Ctrl +Shift+Clinsk a
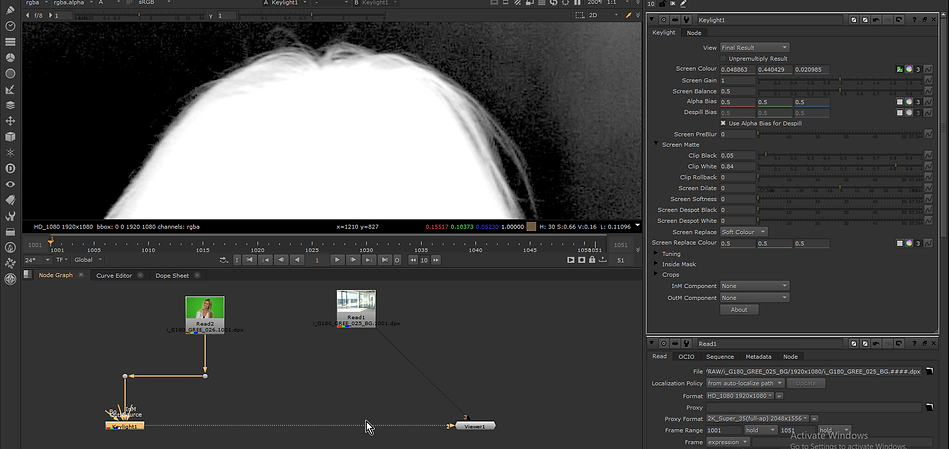
2.Adjust clip Black and white, in screen Matte in properties Panel.

3. Then place a CopyNodeunder the main picture, and MergeNode under the KeylightNode

4. Bring i dot connecting in the top leftthe keyLightNode and other in the MergeNode, rename Keylight as BaseKey, copy&paste between the 2 dots
5 .Cliking in the BaseKeyNode, expand the Black, in MergeNode Properties change the Operation for Mask, bring FilterErodeNode to expand the white in Properties size.
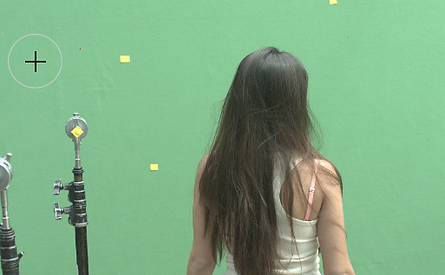
6. Daiteiled hair

7. Bringing a MergeNode,change the operation in Properties for Stencil, and then a RotoNode to do an external Mask.
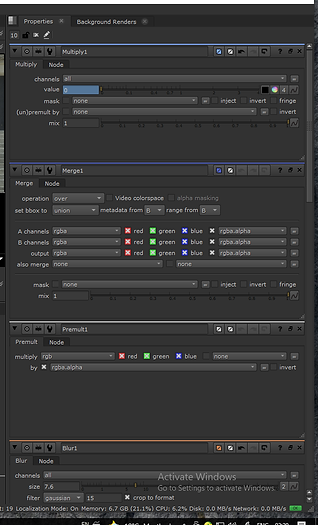
8. Next bring the MergeNode to conect the second image and then the PremultNode anfter the MergeNode.
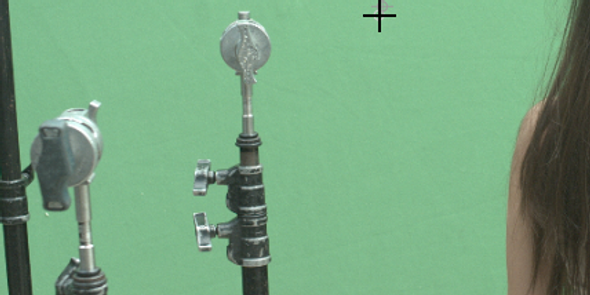
9. Green Spill to be fixed.

10. Copy and paste the SpillNode text to the ViwerGraphy

11. Place the Despill_MadenesNode in the top of PremultNode, under the CopyNode.
At last Keying and render.
Final
Week 5: Advanced Keying
With Mr. Angus Luscombe MA, BSc (Hons), FHEA
Course Leader BA (Hons) VFX and
James Taylor
Two areas to light
Week 3 Mr Angus started the lecture with a slide (Advanced_Keying.pptx) containing bullet points in the two areas of light,
Backdrop and Subject.
Backdrop
•Wide and Soft Lighting (lecture pdf) - (my understating) Wide light covering the entire scene and soft light with Shadows with soft edges.
•Matched Temperatures -
•Dress the BG nicely -
•Smooth and no wrinkles -
•Ideally let hag for a day before -
Subject
•Have some idea of Comp scene -
•Match lighting -
•Indoors: Diffuse -
•Outdoors: Single Hard source (Sun) -
•Classic 3-Point lighting setup - The key light, fill light, and the back light.
The (Advanced_Keying.pptx) also covered important topics that I found very helpful for my next exercise. So I uploaded in my sketchbook as a help and a quick remind every time I access my page.


Keying With Multiples Shades of Green
First step, denoise the scene
1. Drop the DenoiseNode under the main image

2. Choose the best area of the ChromaKey and then flick the RGB Value and then apply it.

3. The grain of the footage was soften

Week 6 and 7 uploaing soon
Week 8: Colour and Grading
With Mr. Angus Luscombe and
James Taylor
Final
.png)
GradeNode to adjust in Luma, GradeNode for colour in gain and Twik the darknes in Gama.png

Sttatue highlights, bringing the KeyerLuminanceNode connecting to reformatNode and change the LuminanceKey, BlurNode to give more inf to in hightlights and then, the gradeNode (below)


To render - ReformatNode changing to HD 1080x1920 format . (Below)

Animating a Grade cross a scene, removing the shadow.

GradeNode placed under the CopyNode and keyframe seted at the end of the time line and near by the begnning... And then back to the end again to adjust the gain and so on..

Change colour using the luminace of an image in AlphaChannel.


Option 1.


Option 2.

Grading trough a mask
.png)
Week 9: Cleanup and Patch repair
With Mr. James Taylor and Angus Luscombe
Introduction to RotoPaintNode - The tools can be used to brush and clone as the pictures are showing below.


Final work
Using the Reveal tool - CheckerBoardNode as bg1 and or the ColorBarNode also can be used, revealing the layers below.


BEFORE and AFTER Wipe - Clean up process
Intro Nuke Clean up static patch - Remove a person from the shot, creating an static patch over where this person is, freesing the frame at the same point.
1. TrackerNode tracking the stairs, just using the translate as it does not do not have any rotation in the shot.
%20in%20this%20case_%20In%20Properties-transform%20select.png)
2 place the outliner in the hero frame (1100) in this case. In Properties-transform select match-move 1-pt and set to current frame. The scene is MatchMoved
%20in%20this%20case_%20In%20Properties-transform%20select.png)

3. FrameHoldNode to freeze the shot as the node is cliked

4. CopyNode and RotoNode, drawing around the man to be removed, creating a patch of that area.

5. Viewing the alpha in the copyNode selected, add a BlurNode under the RotoNode to soft the edges.


6.Bringing the PremultNode to cut out that patch and then MergeNode , the man is gone.
7. Move the TrackerNode from the main source shot under the PremultNode and then a MultiplyPathNode ander the TrackerNode. Set a keyframe value to 1, just before the women walks in..
8. And last change the value to 0 and it is done.

BEFORE and AFTER Wipe
Week 11: Key Skills recap
With Mr. James Taylor and Angus Luscombe

1. RotoNode and then with Bezier, create a shape around the words of the box, select it, right click to select Planar-track this Shape (fwd), tracking it..

2 click the small icon square shape at the right top of the viewer, select CornerPin2D (relative,baked) to see the Relative Node in the NodeGraph


3. Replaced the RotoNode around for better organizing, brought the FrameHoldNode to Set to current frame 1001 - FrameHoldNode to freeze the shot as the node is cliked

4. Roto PaintNode to brush off the box sign

5. CopyNode and RotoNode, drawing around the area to be removed, creating a patch of that area - expanding the hard areas bluring it a bit in the alpha channel.

5.a. Viewing the alpha with the copyNode selected, add a BlurNode under the RotoNode to soft the edges.

6. Bringing the PremultNode to cut out that patch and then MergeNode. The writing in the box is gone.


7. Replace the CornerPin2D1 relativeBaked that was in standingby under PremultNode and click in it...


7..b. ...after Copy to...
7.a. ...and then click on `from`

8. Right click one by one in the `From`1,2,3 and 4 selecting No animation

8.a. `Are you sure you want to delete this animatio, then says yes.


9. Repeat the process in all of them, untill all the blue collors are gonne.


10. A new MergeNode to connect to the new image source, and then ReformatNode

10.b. In Reformat properties change the outputformat to 966x1238

10.c. Resize type to none
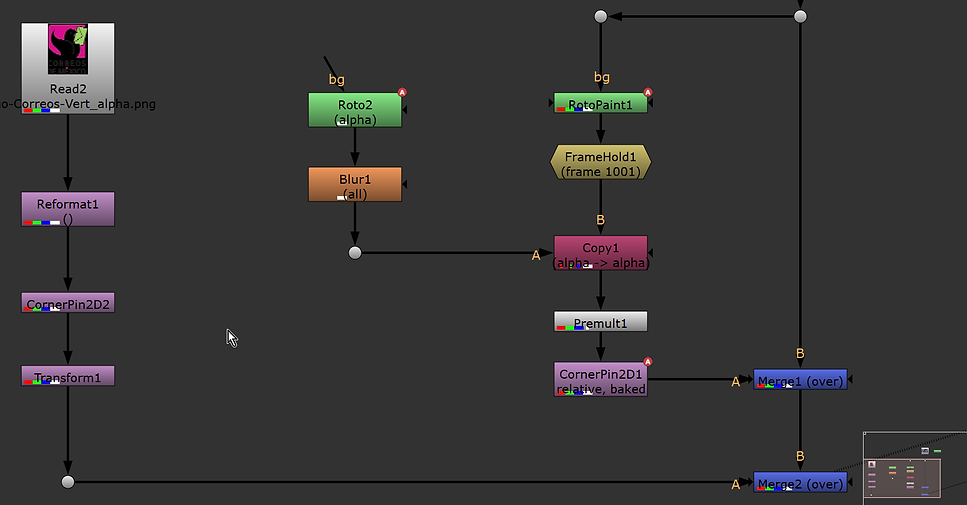
11. Bring the CornerPinNode and TransformNode under the ReformatNode


12. TransformNode to Scale.
13. CornerPinNode to Adjust the corners.
%2C%20SaturationNode%20and%20DefocusNode%20For%20a%20final%20touch.png)
14. GradeNode(Luma), SaturationNode and DefocusNode For a final touch
