Overview of Nuke
This week an overview of Nuke where introduced, the basics of the viewer window, time line including in and out points, the projects settings information’s in the viewer (Bottom), Gama and Gain control de exposure of the image (top viewer). Also, showing the Node Graphs and adding more nodes to the project.
Setting project directory
Each section, the projects will be at the desktop. A folder called Nuke_Overview where downloaded from blackboard to the desktop.
Now with my Nuke 13.0v1 open and before bring any Nuke Comp script, Press S in the Keyboard to set up the project settings. Pressing the `Script Directory` folder in project settings box and search to Nuke_Overview folder saved to the desktop and press open not going in to any of the folders. With the project directory set which is very similar to Maya, to have it all in specific folders, to be a where when to move files around, and then, go to Files, Insert Comp Nodes, navigates to the Nuke_Overview folder saved to the desktop once again, click in the nuke_scripts, and choose the folder, and click open.
To view the image on the viewer window click and press 1 in the keyboard.
Rodrigo Rodrigues
Week 1: Digital Image and Introduction to Photoshop
Jason Martine Webinar Class 08/10/2020 – 14:00
Sky replacement
Stonehenge


Final result
L09 HYBRID ANIMAL TASK
Final result "Insectodile"


Workflow
Pic 1/2
Using the "Move tool" to Transfare the Damselfly picture on the top of the Crocodile.


Pic 3
Click in the layer 2 (Damselfly), use the "Opacity" option, just above the layer, to be able to see the 2 layers; then go to the menu bar in "Edit" ,"Transform" and then "scale" to fit the Croc picture below, "rotate" a bit to fit perfectly.

Pic 4
Using the "Pen tool" cut the left eyes of the Crock, making sure it fits well to the lines of the Damselfly's head. Like the picture. Torn up and down the "opacity" to analyse the work that’s been done..
Name the new layer as Crock left eye. It's a good help to organise the project and for faster work flow.

Picture 5
Repeat the same for the left side, adding a crock eye to the Damselfly’s left eye and name the layer as Crock right eye. To fit both eyes click on their layers, one by one, go to "Edit" then "Transform" and then, use the "Warp".

Picture 6
At last, using the "Clone Stamp Toll " copy and past the details of the Crock skin to the edges in between the 2 animals pictures. See the youtube video in how to use the Clone Stamp Tool.

Photoshop first time user, like my self, this video showing how to apply the "Clone Stamp Tool" can be very helpful.
Final result "Snider"


For the second hybrid animal, the same tools were applied, but this time using 3 images.
Week 2: Green screen and Composing basics
Jason Martine Webinar Class 15/10/2020 – 14:00
Green screen task


Apocalyptic building Sky replacement


Workflow - Steps
Move tool (V) Selected the selected the Rust Image to the working windows on the top of the building image. Extra note - If for some reason is needed to scale a picture without stretch the image, go to Edit and apply the Content Aware ScaleControl click to see selection, click on Vector Layer to match it.
To control de layers on the top of each other uses the blend mode, In this example was applied the overlay and the opacity was changed for 32%.
Next, creates a new layer using the top tab Manu, rename to DodgeBurn Layer, Select mode for Soft Light, tick the option "Fit with soft light neutral colour ( 50% grey)”and click ok. Png vine Image in the edge of the building, scaled and warped found in the transform at the edit top tool bar.
Same process used for an other vine (same image flipped horizontally) Layer style “drop Shadows and Satin” applied into the vine 2 as the right side of the building is darker. The vine 1 layer has been applied drop shadow layer stile. Woman and dry tress added, scaled and added DodgeBurn
Week 3: Fake News & Introduction to Maya
Jason Martine Webinar Class 22/10/2020 – 14:00
MAYA BUILDING BLOCKS EXERCISE
Introduction to Maya
The introduction to software Maya class, with Mr Jason Martine, I understood the basics and fundamentals that I applied to consolidate my two first projects in Maya. "The temple" and "The space ship".
The temple mostly useful shortcuts was Command D to duplicate, subsequently Shift D to build up the stars. Command G (Mac), was also very useful to organise the steps of the stairs in the project. At the end of the work Grouping and Ungrouping files, helped to keep the project tidy.
Here are some of the shortcuts I am getting used to use more often.
F Frame one object
A Frame all objects
H Hide objects in the scene
W Moving tool
E Rotate
R Scale
Parent Object - Select Object "a" and then object "b" then hit P.
Extrude Command, etc.
Temple


Space Ship


Fake-news 1st proposal
Fake news title: London City Airport, a New era.
I used the second proposal below for Assignment 1
Using a sequence of pictures, similar to the ones below, my concept will be to replace the new airplanes on the ground, by old airplanes and add in flying saucers from other dimensions and different planets. Trees and a lot of greenery will take over the scenery.
The fake news will tell the story of how the world changed for better, after nature and magnetised flying saucers, took over of our entire planet earth. The fake news will be placed on the top of London City airport's news website. Well, not really,


Assignment 1 - Fake news 2nd proposal
Fake news title: The South Florida Times.
The South Florida Times
Cape Coral , Florida
November 22,2020
COULD IT BE PREHISTORIC ANIMALS SHOWING UP FROM MILLIONS OF YEARS AGO?
A striking picture a man captured on his go-pro while enjoying family time on a calm Saturday evening. The last thing anyone would have thought was coming. After “David” had lunch with him family, a really loud strike of lighting startled the whole crowd on the beach. From far away sounds that sounded like screaming started to arise out of the far, as the clouds became darker and the noise became louder, everyone stopped at the beach and started to look the way the noise was coming from. One afternoon turned into fearful moments for family s and friends. Soon latter the ocean started to shake and out burst a creature not yet man has seen until that day. Closing the beach was the first idea but the last to get done. After the rising of a monster out of the sea, David says he see’s birds that look if they are from prehistoric time, panting in fear to save his wife and children. A sudden calmness came to David, and he instantly “knew” that these creatures where not going to hurt him or anyone, as the whole crowd seem to have felt the same way David did. Everyone got out there phones and started taking pictures. Davids remark was “ I felt so calm as they got closer, Its like they let me know they where not going to hurt me”. Not even 10 minutes latter the birds have flown away and the sky started to clear up, the ocean settled down. We may never know what happened in those moments but for many sake on cape coral beach that Saturday afternoon, it a moment many will cherish forever. The beaches will be closed for further investigation and understanding. Investigators have started studying the pictures and observing the markings on the creatures to see if it could be possible that prehistoric animals are hiding somewhere in a place we have no discovered yet. If the pictures represent what we think they might, this could be a life changing event for archeologist and many more scientists .

STEPS;
1.I got a beach background
2.I deleted the airplane in the sky
3. I changed the way the ocean looked with about 3 different oceans layered on top
4.I found a little sea animal and mask him into the ocean, then did some feathering,
5 I coloured the sky a little darker on one side and added in some clouds
6. I started to find different birds and used the selection tool to cut them out
7.I cleared some people off the beach with the clone stamp
8. I went and did personal shadows to each bird so they look darker
9. I added in a bright glow for the sun to shine through
10.I played around with some colours and tried to make the birds blend in the best with my knowledge I had.
Assignment 1 - Bond Gadget
James Bond peace Machine
My James bond's Gadget is Machine that trows rockets. fortunately, instead kills, it transforms into peace messages.


WEEK 9 UV MAPPING AND PBR SHADER NETWORKS
Jason Martine
UV Cutting – Mushroom / IN PIECES :/
UV click in Planar (in planar mapping options box click in Z axis – Apply
It will be one single UV piece projected in Z

To cut the mushroom in pieces, select the Mesh in Object mode and go to:
UV in the menu bar and click I 3D and sew UV Tool
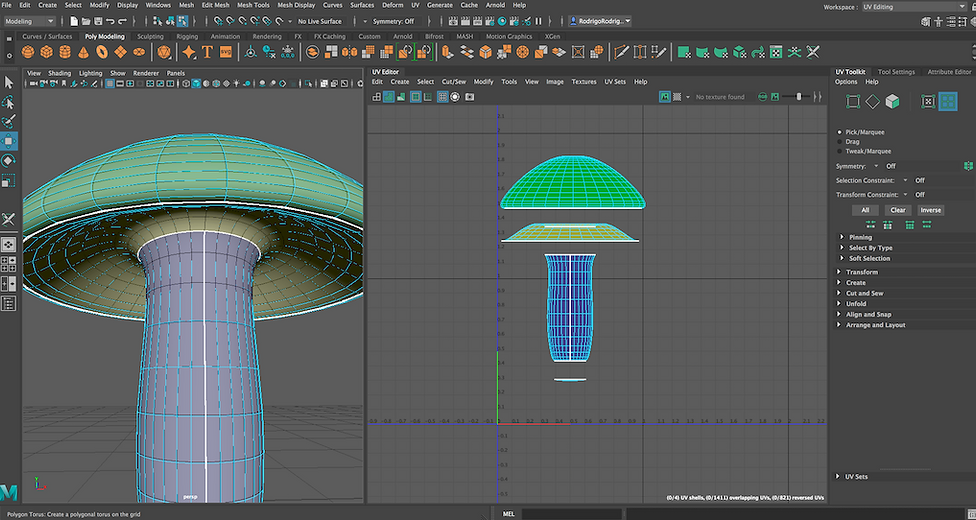
Then double click in the edge where the cut should be, in this case to separate the top of the mushroom as the picture shows.

Right Click+W to UV shew and separate the top of the mushroom.

Then repeat the same process in the top and bottom of the root and the vertical meddle of the mushroom

Resulting in Pic below
UV Unfolding and Layout
Place the arrow in the root of the mushroom and press W Key + Right Click selecting UV then double click in any edge.
At the UV Toolkit in the workspace right side box go to Unfold and click Unfold.

Apply the texture checker to the UV Mesh. Move to fixe any distortion.

In the UV Toolkit in the workspace right side Unfold and click Straighten Shell (as the name says, the Shell will centralises or it get a better alignment).
Then go to Tools at the top bar of the UV Editor and click smooth.
Uses the little box [unfold/Relax] in the work area.

Unfold maximum possible and relax.
In the UV Toolkit in the workspace right side Unfold and click Straighten UVs.
(Play around with [Unfold and Relax] and subsequently click back on Straighten UVs until a perfect square shape is concluded).


Repeat the same process in all of the Mushrooms pieces.


FINAL

Assignment 2 - New York Rooftops
Final


